Friday, January 27, 2012

January 27 Week in review and a look ahead

On Saturday Buz drove the girls and I to Missoula where we met my mother and her friend Shirley.  We ate a great lunch transferred luggage from our van into my mother's vehicle and the girls and I took off for a week at the grandparents house! 

My father mentioned last night how much he loved it when we came for a week because he is able to watch the girls grow during that time. 

Josie said a couple of new words this week; Chase, Seth, Pyper, up, and thank you.  She has said up and thank you before but never consistently.  This week she has been pretty consistent.  She also is our snuggler and one of her favorite people to snuggle with has been her papa.  She has also enjoyed snuggling with her Uncle Bill when they watched the kids while I ran an errand. 

Ellie turned 4 on Monday.  Her father was very heartbroken not to see her on her birthday but her grandparents and uncle, aunt and cousins were very happy he shared her on her special day.  She enjoyed receiving a suitcase with wheels from her grandparents, a new dress from us, crafting supplies and a new Nerf gun from her cousins.  She has enjoyed a week of crafting with her new paper, stickers, glue, and paint.  She has spent every evening with her Nana reading new books on Nana's nook.  She watches a movie almost every afternoon with her papa and she told me today that papa always falls asleep during the movie and she tries to wake him up but he won't wake up. 

I have enjoyed relaxing without having a to-do list of things to accomplish.  I have been able to craft a little bit but nothing to serious.

I did take my sewing machine in to be serviced because I felt like the tension was bad.  The tension was perfectly good but I found out some great info;
  1. Use the recommended foot for the straight stitch (or any other stitch).  The foot holds the fabric properly and guides the fabric.
  2. If you use a different thread in the top and the bobbin it can mess up your tension.
  3. If you really want to get serious about your top stitch there is a top stitch needle and top stitch thread.
This next week is looking like a bit of a full schedule but should be fun.  My goal for the blog is to get a post up about my t-shirt quilts.

Enjoy pictures from our week!

The wind here is ridiculous!
Ellie's Birthday Cake

Jonah, Ellie and Josiah
Nana and the girls "reading" from the nook
Josiah playing with Josie
Josie looking like a big girl on the stairs
The nerf gun.  It could get ugly at our house!  =)

Friday, January 20, 2012

Week in review and a look ahead to next week

I decided a blog post with no pictures = no fun.  So below are some photo's from our week!

Goals for the week of January 15th:
  • Devotions/Prayer daily = Fail
  • Work on a morning routine via FlyLady = Decided to shine my sink instead.  I did an okay job keeping up with it.
  • Make valentine aprons for the girls = Fail
  • Make a breastfeeding cover/burp cloth tutorial = Completed!
  • Figure out a pattern for Micheal's t-shirt quilt = Fail
  • Find pictures of my t-shirt quilts and start writing a post = Fail
  • Add Velcro to the casserole carrier and look at opening an etsy account = Fail
  • Pack to go to Great Falls for a week = Working on it today.
  • Give Cassie her breastfeeding cover = Completed!
Goals for the week of January  22nd:

I am in Great Falls with my parents this week so it changes up my goals a bit

  • Daily Devotions/Prayers
  • Figure out Ellie's birthday party
  • Stay consistent with teaching Ellie 100 Easy Lessons
PICTURES!

Veggie Tales: The big fib and jr drawn by my little artist Ellie.
Dirty Sink
Following FlyLadies cleaning directions

My Shiny Sink
The girls favorite hiding place.

I was trying to work on a breastfeeding cover.  Poor Josie was locked out of the room.
Ellie "reading" to Josie.  I love when the girls play together!

Ellie LOVING the snow!
Ellie loved books when she was little and would hand you the book and then back up into your lap.  Josie has just recently started doing the same thing and we love it!

    Thursday, January 19, 2012

    Tutorial; Burp Cloth Roll-up for the Breastfeeding Cover


    Here is the Burp Cloth Roll-up for the Breastfeeding Cover.  I came up with this idea a few years ago after I ordered a cover on-line (before there were tutorials online for them).  It came with a little purse to put your cover back in after you used it.  I thought it was a cute idea and made one for a friend.  The next time I saw her I asked how she liked the little purse and she said she never used it because it was to hard to fit the cover in each time.  I knew there had to be an easier way to keep the cover tidy while in your diaper bag and decided everyone needs a burp cloth anyway and decided to put the two together.  I used this myself with my last daughter and really liked it and have heard from other mother's I have made them for who also like the idea.  It's an easy project and a nice gift to go along with yesterday's cover.


    Materials:

    Fabric(washed, dried, and ironed): 9"x18" and 2 pieces that are 2"x18" or 1 piece that is 2"x36"
    Terry Cloth: 9"x18" (I like a very soft terry cloth)
    Batting: 9"x18"
    Thread: coordinating to your fabric
    Cutting Mat
    Rotary Cutter
    Rulers
    Starch (I like to starch my hem to get a nice crisp straight line)

    Directions:

    1.  Cut Fabric
    • Cut 9"x18" of the main fabric, terry cloth and the batting
    • Cut 2"x18" of the main fabric for the straps
    •  

     2.  Straps:
    • Iron the fabric in half, open back up and iron both sides so they meet in the crease, fold again and re-iron the first crease.  You should have 4 layers of fabric measuring 1/2" wide
    •  Sew a small seam allowance on the left and right side of the fabric from the top to the bottom.
    • Iron the top down and then down again and sew a seam.


    3.  Burp Cloth
    • Put a crease at the halfway point of top of your burp cloth with the print side up. 
    • Pin the straps up so that the straps stay within the burp cloth and you don't end up sewing them in on accident
    • Lay the Straps within the burp cloth with a tail sticking out.

    • Layer your fabrics; print side up with the straps, then the terry cloth down facing the print and the batting on the very top.

    •   Pin well.  I will use a pin put in sideways to remind me to leave an opening.
    • Sew a 1/4" to 1/2" seam around the burp cloth but make sure you leave your opening for turning it inside out.  I usually will back stitch over the straps.

    • Remove pins and cut the corners.
    •  Turn inside right and use a turning tool (skewer in my case) to make nice pointy corners.
    •  Iron well and sew a small seam around the burp cloth.  Remember to pull the thread to the top before sewing the small seam allowance.

    Finished!
    • Make sure you have trimmed all loose threads and you are done!

    Wednesday, January 18, 2012

    Tutorial; Bringing Thread to the Top

    As I have started to write tutorials I have mentioned bringing your thread to the top before stitching. You want to bring your thread to the top to keep your project looking nice and tidy. Without bringing the thread up at times you end up with a knotted mess on the backside of your project which doesn't look very professional.

    Here is a picture tutorial showing you how to bring your thread to the top.

    1.  Pull the thread in the top needle.  Use your hand wheel and do one stitch.

    2.  Pull on the top thread and it will bring the bottom thread up.

    3.  Pull that bottom thread all the way up as shown.

    4.  Slide both threads to the side and hold while making your first few stitches.

    Tuesday, January 17, 2012

    Breastfeeding Cover Tutorial

    There are a ton of tutorials on the breastfeeding covers so I had debated on creating another one. I have made many of these over the years and when a friend wanted to learn how I tried  to find a tutorial like the one I make but I ended up giving her more directions so I figured I would add to the numerous tutorials out there with making one of my own. I also included a burp cloth that you can roll your breastfeeding cover up in so that it stays nice and tidy in your diaper bag.  I hope that you find the instructions easy to follow!  Tomorrow I will be posting the tutorial for the Burp Cloth Roll-Up.

    This project will take about 2 hours to complete.  

    Materials Needed:
    Fabric: 1 1/4 yards - this includes enough material to make the burp cloth (please wash, dry and iron)
    D Rings: 1 1/4 inch
    Boning:  12" to 16" depending on who you are making it for (not well endowed and on the thinner side 12", well endowed 16", use your best judgment) 1/2" Rigilene Polyester Boning (this is the only kind I will use, you may have to order it via internet)
    Thread: coordinating to your fabric
    Cutting Mat
    Rotary Cutter
    Rulers
    Optional:
    Terry Cloth: 1/2 yard (10" square for the cover and 18"x9" rectangle for the burp cloth, this fabric shrinks a lot.  I would purchase 1/2 yard to be on the safe side and you must wash and dry this before sewing it due to the large amount of shrinkage.)
    Batting: 18"x9" for the burp cloth only (you will not need this for the breastfeeding cover)
    Starch (I like to starch my hem to get a nice crisp straight line)
    Card Stock with 1/2" line drawn on it (Thanks Martha Stewart)

    Directions

    1.  Wash, Dry and Iron your fabric and your terry cloth.
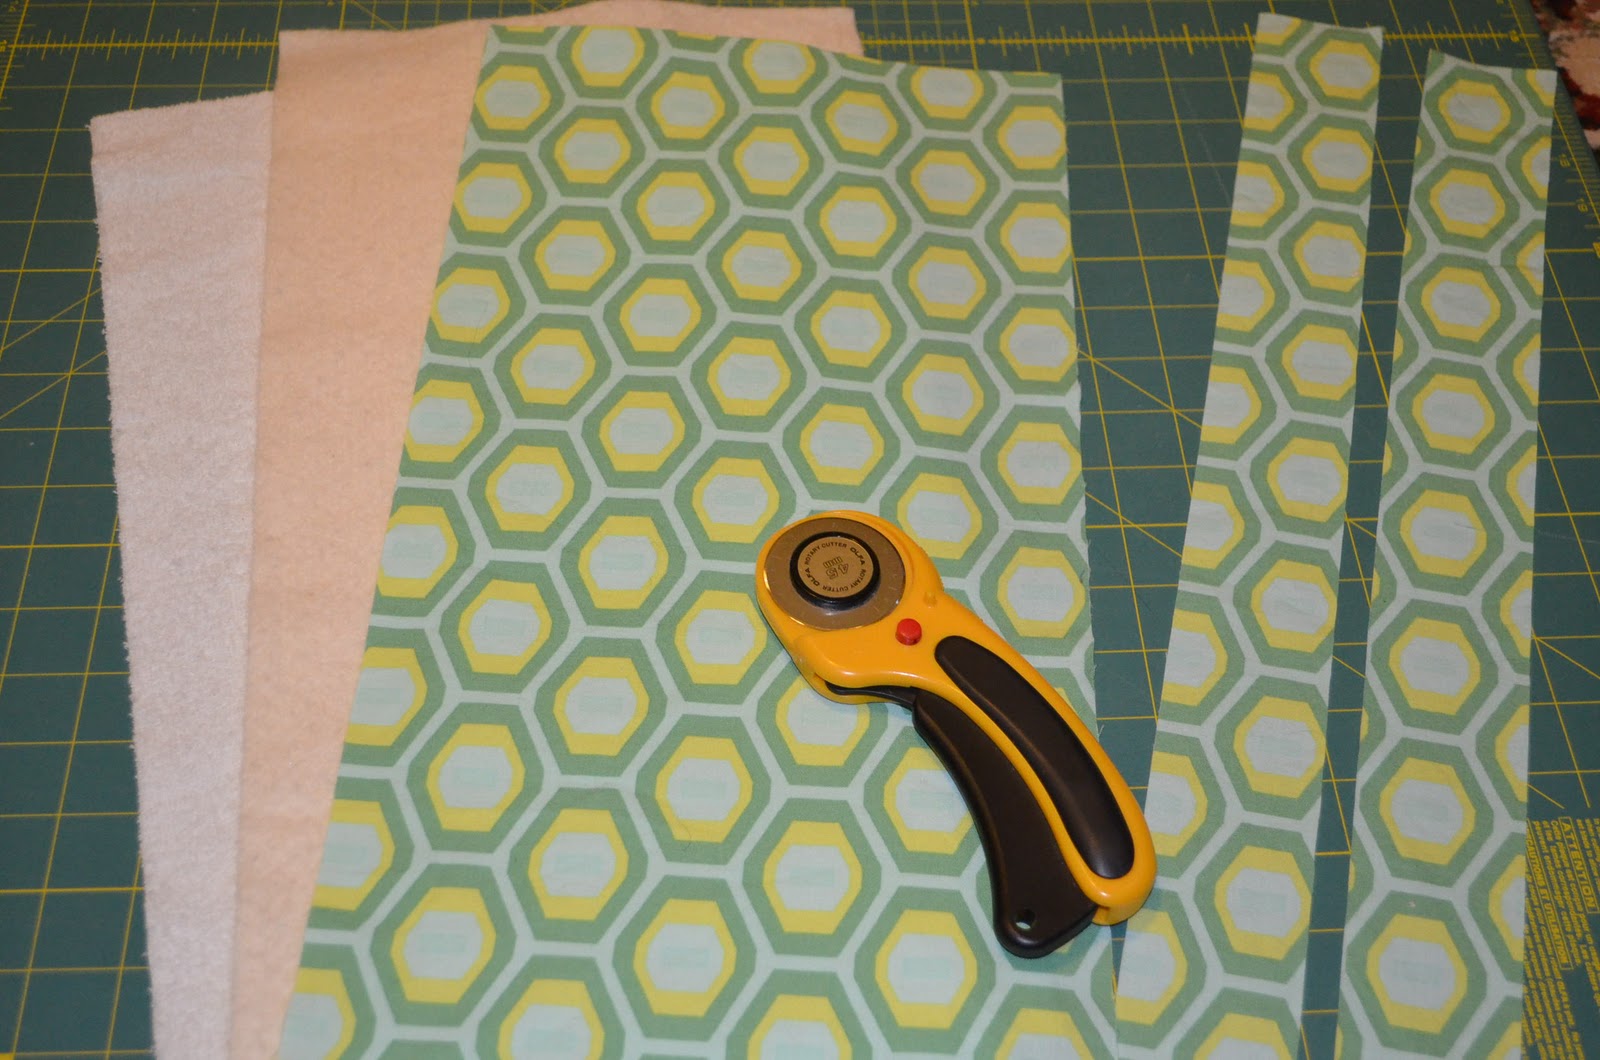
    2.  Cut Fabric. 
    • Straps 5"x25" & 5"x6"
    • Cover 30"x40"
    • Terry Cloth Pocket 10"x10"
    • Boning 12" to 16"

    Fold Salvage Edges (that is where the writing is) together.
    Square up your fabric by taking a taking your square ruler and lining it up against the folded edge and butting your long ruler up against it as shown and cutting off the end.
     
    Measure 30" and cut, this will be our cover.  Measure 5" and cut, this will be our straps.
    Fold the cover again the opposite way so that you have 4 layers of salvage.  Measure from top crease down 20 inches (due to fold this will give you 40 inches).  Cut off the salvage and the remaining couple of inches.
    Make sure you have folded this correct and are cutting off the SALVAGE edge.
     
     
    I use my large square ruler to cut out a 10" square from the terry cloth material.
     Cut the boning 12" to 16".
    We will leave the strap the way it is for now and after we sew it we will then cut it into two (if you already cut it's not an issue)

    2.  Straps:

    Iron the fabric in half, open back up and iron both sides so they meet in the crease, fold again and re-iron the first crease.  You should have 4 layers of fabric measuring 1 1/4" wide.
    Sew a small seam allowance on the left and right side of the fabric from the top to the bottom.
    If you have not yet cut your fabric do so at this time (25" and 6")
    Fold down the top of the long strap 1/2" and iron.  Fold again 1/2" and iron.  On the smaller strap fold down 3/4" and iron and again 3/4" and iron again, insert the D rings within the fold.
    From this point on you will always bring your thread to the top before sewing.

    Sew a small seam on the top and bottom of the fold.  Sew two seams across the fabric as shown on the D ring strap.

    3.  Cover:
    • Take your card stock that has a 1/2" line and iron a 1/2" seam all around your cover (I like to use my starch spray to get a nice crisp line).  Then do it one more time.
    • Iron your 10" square terry cloth material in 1/2.
    • Sew a small seam at the top of the terry cloth.  This fabric is very stretchy and sometimes doesn't like to go through the sewing machine so I will normally start sewing a small piece of scrap material and then feed the terry cloth in.  You may notice some stretching after you have sewn it.  Get your square ruler out and square it back up the best you can.
    • Lay your cover down so that the back side is facing you.  Place the terry cloth triangle in the bottom right hand corner and pin well.  
    • Sew a 1/4 seam on both sides and the bottom (do not sew the top as of yet).
    • Take the corner where the terry cloth is and fold it in half.  Take your ruler and a marking pencil and mark a 2" line on each side of the fold.  Bring your thread to the top and sew from your seam up to where the terry cloth ends for each line that you drew.
    • Fold the top of the cover in half and make a crease.  Fold the boning in half a make a small crease.  Match the two up and place the boning inside the 1/2 fold you have already created.  Make sure that once the boning is in it is facing the correct way.
    • Take both straps and fold them up 1/2" at the bottom and iron it. Tuck the longer one into the left side of the fabric so that half of it is under the boning and half is not and pin it. This should be the left side as if the mother was wearing it (unless she is left handed, then do opposite). Tuck the D ring strap into the right side of the fabric so that half of it is under the boning and half is not and pin it.  This should be the right side as if the mother was wearing the cover (opposite if left handed).
    • You will be sewing two seams at the top.  Start sewing at right/left hand seam you started/ended with before, making a 1/4" seam allowance.  Then make a smaller seam allowance towards the top of the fabric.
      4.  Finish it up!
      • Make sure you have trimmed all threads.
      • Wash, dry, iron and enjoy!
      • See tomorrow's post for the Burp Cloth Roll-Up
      Completed breastfeeding cover with terry cloth pocket and Burp Cloth Roll-up.
      Breastfeeding cover all rolled up for easy storing in the diaper bag!

       Please leave a comment or link below if you make one!  
      I love hearing from everyone!