
It took about 3 hours from start to finish in order to complete. This project is recommended for the sewer that has some experience.
Materials Needed:

Fabric (Washable Home Decor Fabric): 2 yards that you will pre-wash (I used 1 yard each of coordinating fabric for the inside/outside of the carrier)
Thread: 1 spool that coordinates with the fabric
Insulated Batting: 1 yard
Oval Plate
Dowels: 2 7/16” diameter cut to 14"
Peg Board: 9 3/4" x 15"
Velcro: 2" wide, 2 pieces cut into 6" lengths each
Sewing Machine
Cutting Mat
Rulers
Rotary Cutter
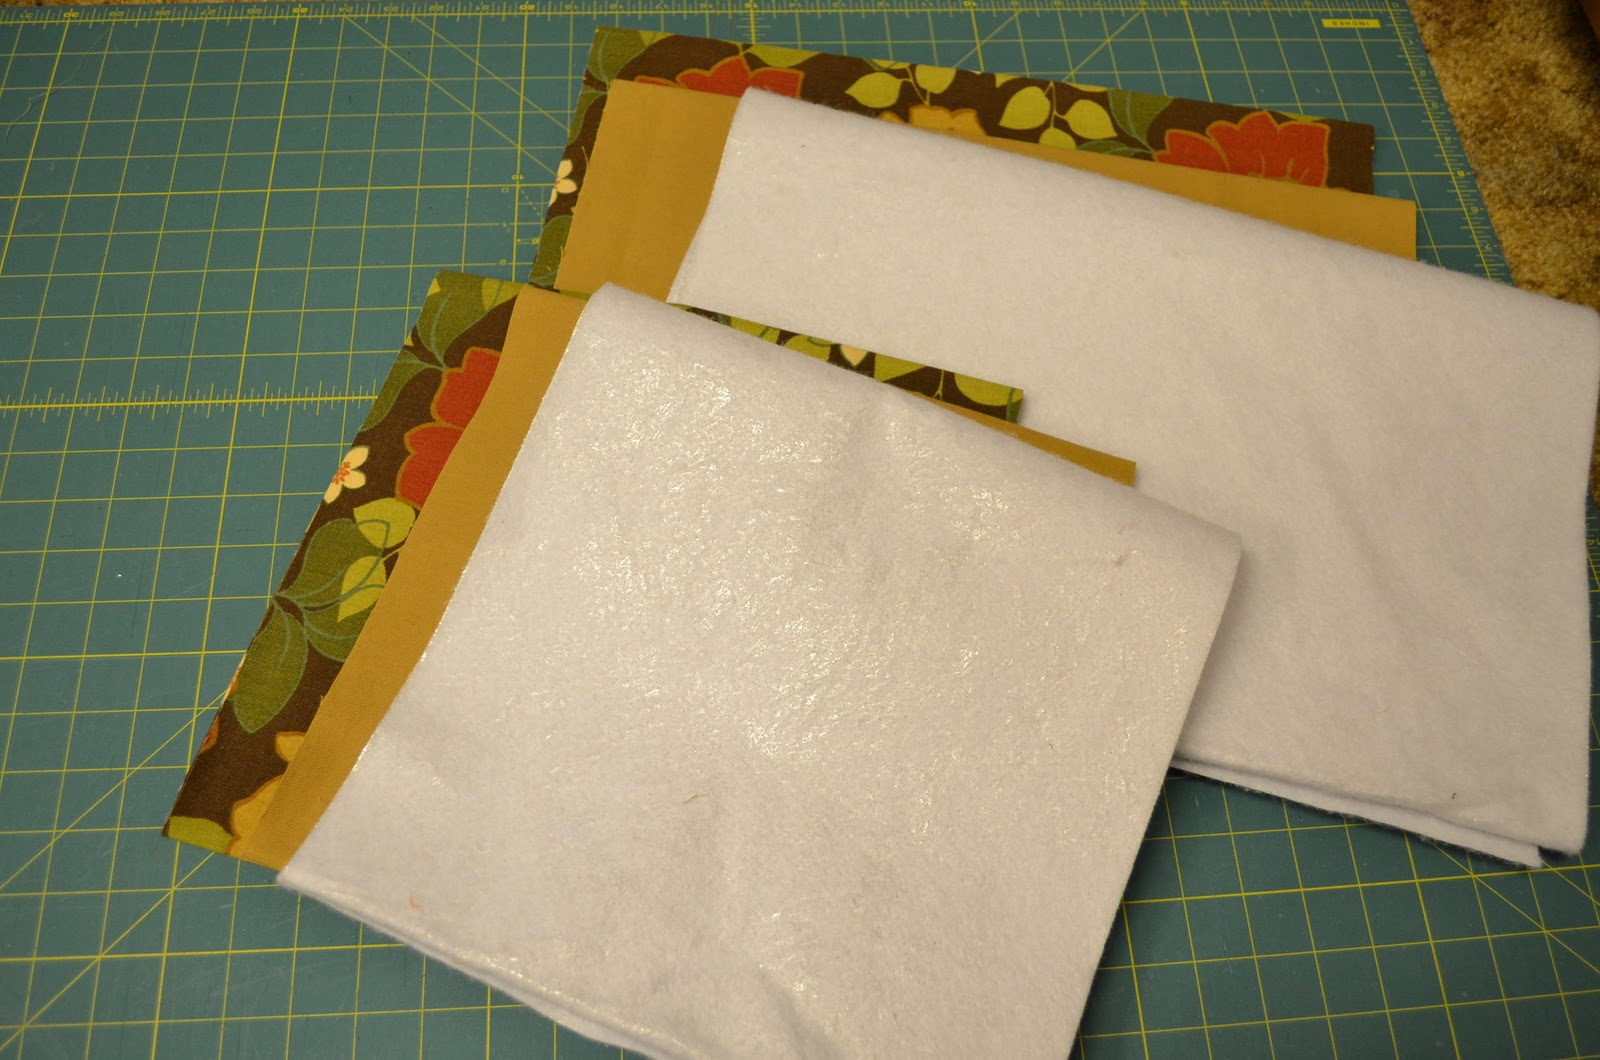
1. Wash, dry, and iron your fabric (not the insulated batting).
2. Cut out of each of your coordinating fabrics and your insulated batting (17" wide and 11.5" wide).
Detailed directions below:
- Take your first piece of fabric and fold in half with selvage edges together.

- Take the top fold line and fold it again down to the selvage edge.
- Line up your square ruler to find your straight edge and use your rectangle ruler to "square" the end of the fabric.

- Make your first cut of 17" and then your next cut of 11.5"
- Do this for both yards of your coordinating fabric

- Your insulated fabric is most likely already folded in half one time. "Square" the end as stated above and make your two cuts of "17 and 11.5"


- At this point you should have 3 layers of 17" wide materials and 11.5" wide.
3. Layer the 17" wide fabrics (Right sides together and make sure the insulated batting is facing the correct way according to its directions).

4. Cut off the selvage edge from one end and measure the below inches toward the other end and cut. You will want 30" if you want a sleek, small carrier that fits a 9x12 pyrex with a cover or 38" if you want a carrier that will also hold a bowl.

5. With the 17" x 30" layers pinned together you will want to grab your oval plate and decide the depth you want your handles. I had mine about 4 to 5 inches. I marked my plate with a marker and made sure my marks were even by lining it up on my cutting mat. I then made sure I had it even on my fabric by making sure I had the same number of inches on each side. You may also see that I notched the batting. I did this so that when I turn my fabric right side out I can square my corners better.

6. Layer the 11.5" fabric, right sides facing each other and making sure the insulated fabric is laying the correct way according to the directions. Cut off the selvage end and then measure 43 inches and cut (43" does not need to be exact, just get as close as your fabric allows).
7. Sew 1/2" seam allowance leaving a 4" opening to be able to turn the fabric inside right. On the wider fabric sew right on top of the markings you made from the oval plate.

8. Cut 1/2" seam where you sewed around the half oval.

9. Cut "mountains" inside the oval as pictured below.

10. Trim the corners.

11. Turn inside right and get ready to iron.

12. Iron down the spot that you left open and the rest of the fabric so that it is nice and flat. Pin the opening closed.


13. Make a small seam around the entire piece of fabric (you can see my little helpers feet below).


14. We need to layer the two pieces now.

15. Fold the wider piece of material in half and mark the half way point with a pin on both sides of the fabric.

16. Fold the thinner piece of material in half and line up with the halfway point of the wider fabric. Mark each end with a pin onto the wider fabric so that you know where to lineup the thinner piece onto the wider fabric. Do this on both sides of the fabric.

17. Fold the wider fabric in half width wise and make a crease in the material at the halfway point. Fold the thinner material in half length wise and make a crease. Line up the creases with the thinner fabric being on top. Your thinner fabric should line up between the pins you made in the previous step plus line up with the creases you made. Make sure you have an even amount of thinner fabric on each side of the wider fabric and pin it in the corners.

18. On the thinner piece of fabric sew only one long edge down. Sew right on top of the seam. Leave the other seam open to allow you to slide in the peg board as shown below. Flip the fabric over and sew on top of the seam of the wider fabric. Sew both edges. When you are done it should look like the picture below.

19. Fold down your carrier handles 1 1/4" down, pin and sew straight line right on top of the seam leaving an opening on both sides to be able to insert your handle all the way through.


20. You should now have a product that looks like this.

21. Adding the Velcro (2"wide 6" long); place your Velcro 1" from the top and 1" from each side and sew them onto the front of the fabric. Sew the other pieces of fabric on the backside of the fabric 1" from the top and 1" from each side and sew them down. This will hold your 9x12 pan tightly in your carrier.

22. Place your dowels through the handles. Insert your peg board and trim the board if necessary. You are now ready to take a casserole anywhere this Holiday Season!

Pin It
Linked to the following link parties:
http://simplydesigning.blogspot.com/
http://funtocraft.blogspot.com/
http://www.fingerprintsonthefridge.com/
http://www.happyhourprojects.com/
http://naptimecrafters.blogspot.com/
http://www.lovelycraftyhome.com/
http://shabbynest.blogspot.com/
http://itsahodgepodgelife.blogspot.com/
http://www.mineforthemaking.com/
http://thecraftyblogstalker.blogspot.com/
http://www.katiesnestingspot.com/
http://raegunwear.blogspot.com/
I love this Jolen! So great. I wish I was crafty because this is something that I definitely would be interested in making.
ReplyDeleteI love this too.
ReplyDeleteI like it! I have to try to do something like this. It,s very good idea.
ReplyDeleteThanks for the tut!
ReplyDeleteThis the best carrier I have seen! Been wanting to make some for a long time. THANK YOU
ReplyDeleteMeghan in Medford Oregon
This is a fantastic idea! I love the idea of using dowels for handles. It would make it that much stronger. The pegboard is a great idea too for some stability.
ReplyDeleteWonderful tutorial! Thanks for sharing!
Muy bonito el resultado. Y el tutorial genial!
ReplyDeletewww.arreboditcomunapantigana.blogspot.com
Thank you so much for this wonderful tutorial! I made one of these years ago and I use it quite a lot at the holidays or just to take a casserole over to my daughter's house. I lost the pattern, so this one of yours will come in handy to make more for gifts. The only difference is with mine I put in a pocket to hold a large teflon serving spoon.
ReplyDeleteHappy New Year!
Nettie
I love this what a great idea! I'd love you to add it to my what we wore and made party over at http://raegunwear.blogspot.com
ReplyDeleteI really like this idea and will be making it soon. Thanks! Saw it on Pinterest... (which I'm now addicted to!)
ReplyDeleteAlison
www.shessewsmart.blogspot.com
Thank you so much for sharing! Although the holiday season is over, I plan on making at least one of these for my home, and perhaps several more for Christmas gifts next year - great job!
ReplyDeleteCandice
craftyconcoction.blogspot.com
Love the fabric!! Where can I find it?
ReplyDeleteAll the fabric came from the Home Collection from Joann Fabric and Craft Store. It was purchased around Thanksgiving time so I am unsure if they would still have it.
DeleteThank you. Will make a trip there!
DeleteLove the fabric!! Where can I find it?
ReplyDeleteLove this thanks so much for sharing
ReplyDeleteI have one of these I received as a gift and it is used all the time. I will give this a try - I could use another one. Great tutorial!
ReplyDeleteLove this tutorial and have made a couple as gifts. Is there a reason you used Home Decor fabric instead of regular cotton fabric? Just the size or is the heavier weight fabric better for hot dishes? Hoping I haven't goofed...
ReplyDeleteJana,
DeleteII am so excited that you love the tutorial and have made a few of these already. I liked the heavier weight of the Home Decor fabric but if cotton worked on your other ones I think that is great! Thanks for the comment, always fun to hear from people that have used the tutorial!
Jolen
I love your pattern, I hope to make it as a gift soon. My one question is about the dowel handles...How do you keep them from sliding out by accident. I can see that they should be removable for ease in washing the carrier, but I'd hate to have one fall out while carrying it...
ReplyDeleteThe ends of mine are closed and the dowel is easily removed for cleaning but you may have to pull the pegboard out. (No pegboard in mine and no issues). Mine also has a serving spoon holder sewn on the flap that has the dowel. It looks like an elongated U and has binding around the raw edges. This is a great pattern
Deletei made this pattern and i loved it
ReplyDeleteI am so glad you made it and loved it! I would love to see a picture if you blogged about it! =)
DeleteBeautiful! Functional art at its best.
ReplyDeleteHey there, I bought some new fabric this weekend and I would LOVE to try this, but where would I buy pegboard in this size?! I cannot find it listed on any of the following sites in this size: Hobby Lobby; Wal-Mart; Home Depot; Jo-Ann's Fabrics/ Craft; nor Hancock Fabrics.
ReplyDeleteI bought it at Lowe's/Home Depot and had to cut it myself to size.
DeleteOh, I wonder if Lowe's could have cut it for you since they offer a complimentary cutting service! And, thanks for the source! :)
DeleteI want to make this with the handles going across the width instead of the length. I saw a similar pattern where wooden spoons were used instead of dowels and they'd be too short to use lengthwise - have to put my thinking cap on and switch some things.
ReplyDeleteI just finished making a Casserole Cover for a Christmas Gift. This is the first project I have sewn in over 10 years, and only my 4th or 5th sewing project. It turned our great. Thanks for the wonderful instructions!!
ReplyDeleteHow do I download pattern for furture use?
ReplyDeleteWhat size is your casserole dish?
ReplyDeleteSpoon Rest in the shape of a cucumber or pickle?
ReplyDeletespoon rest
This is a nice post in an interesting line of content.Thanks for sharing this article, great way of bring Vero Beach Tutoring to discussion.
ReplyDeleteAll thanks to this great herbal doctor who cured me from (LUPUS DISEASE) his name is dr imoloa. I suffered lupus disease for over 8 years with pains like: joints, Skin rash, Pain in the chest, swollen joints and many more. The anti-inflammatory drugs couldn’t cure me, until I read about his recommendation. 2 months ago, I contacted him through his email address. drimolaherbalmademedicine@gmail.com . and he sent me the herbal treatment through DHL courier service and he instructed me on how to drink it for good two weeks. after then, And I was confirmed cured and free at the hospital after taken his powerful herbal medications You too can be cured with it if interested, he also uses his powerful herbal healing medicine to cure disease like: parkison disease, vaginal cancer, epilepsy, Anxiety Disorders, Autoimmune Disease, Back Pain, Back Sprain, Bipolar Disorder, Brain Tumour, Malignant, Bruxism, Bulimia, Cervical Disk Disease, cardiovascular disease, Neoplasms, chronic respiratory disease, mental and behavioural disorder, Cystic Fibrosis, Hypertension, Diabetes, asthma, Inflammatory autoimmune-mediated arthritis. chronic kidney disease, inflammatory joint disease, back pain, impotence, feta alcohol spectrum, Dysthymic Disorder, Eczema, skin cancer, tuberculosis, Chronic Fatigue Syndrome, constipation, inflammatory bowel disease, bone cancer, lungs cancer, mouth ulcer, mouth cancer, body pain, fever, hepatitis A.B.C., syphilis, diarrhea, HIV/AIDS, Huntington's Disease, back acne, Chronic renal failure, addison disease, Chronic Pain, Crohn's Disease, Cystic Fibrosis, Fibromyalgia, Inflammatory Bowel Disease, fungal nail disease, Lyme Disease, Celia disease, Lymphoma, Major Depression, Malignant Melanoma, Mania, Melorheostosis, Meniere's Disease, Mucopolysaccharidosis , Multiple Sclerosis, Muscular Dystrophy, Rheumatoid Arthritis, Alzheimer's Disease Contacts him today and get permanently cure. contact him via... email- drimolaherbalmademedicine@gmail.com /whatssapp-+2347081986098.
ReplyDeletewebsite-www.drimolaherbalmademedicine.wordpress.com
I am having a difficult time with this pattern. Do you cut the handle arcs in the 11.5 x 17 piece of fabric. I only have one piece this size do I need two?the. We cut 3 pieces 17” x 30” or 38”and layer them.all of a sudden we have a 43” piece of fabric this step #6. I am totally confused can someone please clarify for me.
ReplyDeleteHow would I make this out of a 1 piece top and 1 piece bottom fabric......like a plus (+) sign piece of fabric with the insul-brite batting?
ReplyDeleteI bought alot of these back home in Oahu. Do you sell these? I'd be interested in buying them from you.
ReplyDeleteWould this pattern change for a 9.5x13.5” dish?
ReplyDeleteJust finished making an order for 20 of these Casserole Carriers .I go one step further and stitch up the sides 2and a half inches .Holds your dish in more securely.
ReplyDeleteI really happy that i and my husband are cured of (HERPES SIMPLEX VIRUS) with the herbal medicine of Dr Aziegbe, i have been suffering from this disease for the past 1 years without solution until i came across the email of this doctors who have cure so many people with his herbal medicine, i also choose to give him a chance to help me and my husband, he told me what to do and i kindly did it, and he gave us his herbal medicine and direct me on how to use it, i also follows his instruction on how to use it and he ask us to go for a check up after 2 weeks and which i did, to my greatest surprise our result came out as negative, we are really happy that there is someone like this Dr Aziegbe who is ready to help anytime any day. to all the readers and viewers that is doubting this testimony stop doubting it and contact this Dr Aziegbe and see if he will not actually help you. Contact him on via email... DRAZIEGBE1SPELLHOME@GMAIL.COM . also cure all kinds of diseases , HEPATITIS, A,B,C , CROHN'S DISEASE CANCER, DIABETICS , FRIBLOD.
ReplyDeleteThank you so much for sharing this. It is exactly what I was looking for. I very much appreciated not having all the ads.
ReplyDeleteMy husband had MND Chronic Disease , first symptom was weakness in his fingers, one day, we had a dream life with early retirement and then, when we went to find out about the weakness, our whole world almost changed. There are so many things that can be said abt the suffering and frustration of people with Chronic Disease , we look back now and realize in many ways how lucky we were to found DR JACOB herbal cure that was able to get rid of my husband Chronic disease totally, we had time to enjoy life and above all we all had time to also share this great testimony , many people lose loved ones without closure. I can’t imagine going thru all that you or your family had to live with daily, do not hesitate to contact drjacobherbalhome2@gmail.com WhatsAPP +1 (336) 962-8303
ReplyDeleteI have never thought herbal medicine could cure diabetes. However it wouldn't have been possible for me to gain my health back without the kind support and help of the Doctor Matthew. I would like to extend my golden sincere thanks to Doctor Matthew who helped me with his herbal medicine. which he sent to me through DHL courier services. I start by introducing the great herbalist who is so powerful and good in herbal medicine to cure any kind of illness. I am highly indebted to Doctor Matthew for his help in curing me from diabetes with his herbs. Don't let anyone deceive you because I am a living testimony. The difference between Ordinary and Extraordinary is the "Extra" My dear friends go for the Extra and regain your health back to normal again with herbs. You can purchasing Doctor Matthew herbal remedy through his WhatsApp number: +2349063784396 or via email herbalistmatthew@gmail.com
ReplyDeleteI am here to give my testimony about Dr Matthew who helped me.. i want to inform the public how i was cured from (HERPES SIMPLEX VIRUS) with herbs🌿, i visited different hospital but they gave me list of drugs like Famvir, Zovirax, and Valtrex which is very expensive to treat the symptoms and never cured me. I was browsing through the Internet searching for remedies on HERPES and I saw a comment of people talking about how Dr Matthew cured them. When I contacted him he gave me hope and sent a Herbal medicine to me that I took for just 2 weeks and it seriously worked for me, my HERPES result came out negative. I am so happy as I am sharing this testimony. My advice to you all who thinks that there is no cure for herpes that is Not true just contact him and get cure from Dr Matthew healing herbal cure of all kinds of sickness you may have like
ReplyDelete(1) CANCER,
(2) DIABETES,
(3) HIV & AIDS,
(4) URINARY TRACT INFECTION,
(5) CANCER,
(6) IMPOTENCE,
(7) BARENESS/INFERTILITY
(8) DIARRHEA
(9) ASTHMA
(10)SIMPLEX HERPES AND GENITAL
(11)COLD SORE
HERPES. he also cure my friend from cervical cancer Email: herbalistmatthew@gmail.com or whatsapp him on +2349063784396
I'm Using this opportunity to thank Dr. Ajele ,it's a grateful thing to me, for over years I have been sick with Hepatitis B and Herpes virus, I have done a lot of things to get cured of my diseases and nothing has worked out. I have taken different types of medication for it , but it still doesn’t work for me. I still keep going for a check up so that the doctor will tell me my disease has gone, because i am taking my medicine with no result nothing has been cured, I have spent a lot of money just to get cure of Hepatitis B. until my old time friend came to my place and saw what am going through, and then direct me to contact Dr. Ajeje who is a very powerful man, which I did explain my problem to Dr. Ajele and send me a herbal remedy bottle and explain to me how I should drink it. So I started to drink the herbal tea in one week that I drink the herbal tea. I went for a check up to check if I’m cured from Hepatitis B disease, then the nurse told me nothing is wrong with me anymore and said I’m fine. I am the happiest person right now. I promise Dr Ajeje I will testify about his good work on the internet. Reach out to Dr. Ajele Via: DRAJELEHERBS@YAHOO.COM Thank you so much sir for what you did for me you are the best of all. TEXT OR WHATSAPP: +234 707 696 3734.
ReplyDeleteI had HIV I was told there was no cure except medication that can control it, I totally lost hope, all I could think was losing my life because I was so depressed and confused about the whole situation , few weeks ago I read about Dr Mathew natural herbalist which was guaranteed, I ordered the medicine after using it for 2 weeks I went for test and I tested negative I am so excited to share my testimony, all thanks to Dr Matthew, you can also contact Dr Matthew via WhatsApp or call +2349063784396 OR herbalistmatthew@gmail.com , Dr Matthew also have medications for, Kidney failure ,Diabetes 1/2, CANCER, ALS (Lou Gehrig’s disease), Hepatitis A/B, chronic pancreatitis, Emphysema, COPD (Chronic , Obstructive Pulmonary Disease), asthma, Acute angle-closure Glaucoma, CHRONIC PANCREATITIS thanks everyone God bless.
ReplyDeleteI would never have believed that cold sore herpes virus can be cured with ancient herbal medicine because I just tested negative for the second time since I finished drinking the medicine a herbal doctor sent to me, all the sores and blisters were gone immediately I started drinking the herbal meds, so I want you all to know that herpes virus can be cured with the right use of ancient herbal medicine so visit this herbalist called doctor excel on his Email: email;dreasbnamrootandherbal1@gmail.com or what'sap +2348106600701 and he is capable of curing HIV/AIDS, HERPES, HPV, HSV1&2, COLD SORE, CANCER ,DIABETES
ReplyDelete